Your Google Shopping feed has 60+ attributes. Most merchants only know about a handful of them. And the ones they do know, they often get wrong.
I’ve spent 12+ years managing ecommerce Google Ads accounts. In that time, I’ve seen feed issues cause everything from wasted ad spend to full account suspensions. Almost always, the fix comes down to getting the right attributes set up correctly.
This guide covers every product feed attribute that matters for ecommerce advertisers. Not just what each one does, but how to actually use it to get better results from your Shopping campaigns.
Use it as a reference. Bookmark it. Come back when you hit an error in Google Merchant Center and need to figure out what went wrong.
Table of Contents
How your product feed actually works
Before we get into individual attributes, here’s the mental model.
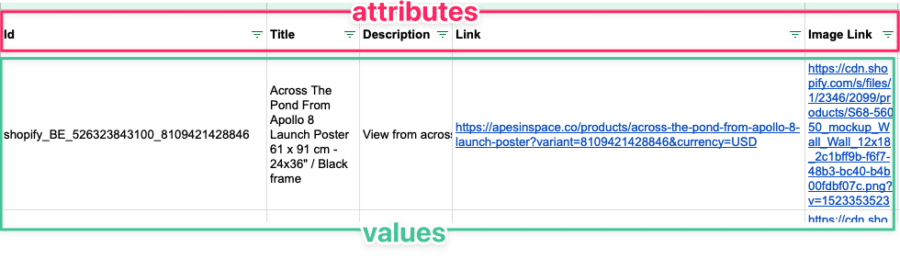
Your product feed is a big spreadsheet. Each row is a product. Each column is an attribute. Google reads this spreadsheet to decide which products to show for which searches, and how to display them.
Some attributes are required. Without them, your products get disapproved and won’t show at all.
Others are recommended. Skipping them won’t get you disapproved, but it will cost you performance. Google uses every piece of data you give it to match your products with the right searches.
Then there are optional attributes that only matter for specific product categories or campaign types.
I’ve organized this guide by priority. Start at the top, work your way down.
Required attributes: get these right or your products won’t show
These are the non-negotiables. Every product in your feed needs these attributes, properly formatted, or Google will disapprove them.
id (product ID)
What it is: A unique identifier for each product in your feed.
Format: Up to 50 characters. Letters, numbers, and underscores.
Why it matters more than you think: Your product ID is how Google tracks performance history for each product. If you change a product’s ID, Google treats it as a brand new product. That means you lose all the historical data Google has accumulated, including quality signals and bidding performance.
My recommendation: Use your store’s SKU as the product ID. It’s already unique, it’s stable, and it makes it easy to match feed data back to your inventory system.
Common mistake: Some Shopify apps generate random IDs or change IDs when you update products. Check that your IDs stay consistent after feed refreshes. If they don’t, you’re resetting your products’ performance history every time.
title (product title)
What it is: The name of your product as it appears in Shopping Ads.
Format: Up to 150 characters. Google shows roughly 70 on mobile, more on desktop.
This is the single most impactful attribute in your feed. Google uses your product title to determine which search queries trigger your ads. A bad title means irrelevant traffic. A good title means showing up for the right searches at the right time.
Here’s something most advertisers don’t realize: your feed title doesn’t have to match your website title. In fact, it shouldn’t. 81% of high-performing advertisers use different, more keyword-optimized titles in their feeds compared to their product pages.
Title formulas that work:
For apparel: Brand + Gender + Product Type + Color + Size + Material
Example: “Nike Women’s Running Shoes Black Size 8 Mesh”
For electronics: Brand + Product + Model Number + Key Specs
Example: “Sony WH-1000XM5 Wireless Noise Cancelling Headphones”
For home goods: Brand + Product Type + Material + Color + Dimensions
Example: “West Elm Coffee Table Walnut Brown 48 inch”
Key tips:
Put the most important keywords first. Google gives more weight to the beginning of the title.
Use digits instead of spelled-out numbers (“8” not “eight”).
Capitalize each word. It looks more professional in search results.
Don’t stuff keywords. “Blue Dress Women’s Blue Summer Dress Blue” will hurt you.
For a deeper dive into title optimization, including data from analyzing 151 Shopping Ads, read my product title optimization guide.
description (product description)
What it is: A text description of your product, up to 5,000 characters.
Here’s the thing about descriptions: customers rarely read them in Shopping Ads. Only about 150-200 characters show in expanded product views. But Google reads every word to understand what your product is and match it to search queries.
That means you’re writing descriptions for Google’s algorithm, not for the shopper.
The formula: Brand + Product Type + Who it’s for + Key Features + Variant Details
Include attributes in the description that aren’t obvious from the title or image. If your product comes in “desert sand” color, mention it. If it’s made from organic cotton, say so. This helps Google match your product to long-tail queries like “organic cotton baby blanket.”
What to avoid: Don’t include prices, shipping info, or promotional text (“SALE!” or “Free shipping!”) in the description. Google will disapprove your product. Those details belong in their own attributes.
For the complete guide to writing descriptions that perform, see my product description guide.
link (product URL)
What it is: The URL of the product’s landing page on your website.
Format: Must start with http:// or https://. Up to 2,000 characters. Must be RFC 3986 compliant.
The critical rule: The link must go to the specific variant the customer sees in the ad. If your ad shows a red medium t-shirt, the link must take them to the red medium t-shirt page, not the generic t-shirt page where they have to re-select color and size.
Mismatches between your ad and landing page are one of the top reasons for product disapprovals. Price, availability, title, and the product itself all need to match between your feed and the page the link points to.
Make sure your landing pages are mobile-friendly. Google checks this, and non-mobile-friendly pages can trigger warnings.
image_link (main product image)
What it is: The URL of the primary image for your product.
Format: URL pointing to a JPEG, PNG, GIF, BMP, TIFF, or WebP file. Minimum 100x100px for most products, 250x250px for apparel. I recommend 800x800px or higher.
Google’s image rules are strict:
White background only (with some exceptions for hardware and software categories).
Product must fill 75-90% of the image frame.
No text, watermarks, borders, or logos on the image.
No placeholder images or generic illustrations.
Here’s what I tell my clients: your product image is the first thing shoppers see. If your competitor has a crisp, professional photo and yours looks like it was shot on a phone in poor lighting, they’ll get the click. Invest in good product photography. It pays for itself.
For more on image requirements and common problems, see my image link attribute guide.
price
What it is: The price of your product including currency code.
Format: Number with up to 2 decimal places + ISO 4217 currency code. Example: “29.99 USD”
The iron rule of pricing: your feed price must match your landing page price exactly. Not close. Not rounded differently. Exactly the same. Mismatches trigger warnings, and repeated mismatches can get your account suspended.
Use dots for decimals, not commas (33.00 GBP, not 33,00 GBP). Use ISO currency codes (USD, not $).
If you sell across multiple countries, Google offers automatic currency conversion that displays prices in the customer’s local currency.
For common price-related errors and how to fix them, check out my price attribute troubleshooting guide.
availability
What it is: Whether the product is currently in stock.
Accepted values: “in_stock”, “out_of_stock”, or “preorder”
This one seems simple, but getting it wrong is expensive. If your feed says “in_stock” but the product is actually sold out on your site, Google will disapprove the product and flag your account. Do this often enough and you risk a full account suspension.
The fix: make sure your feed syncs frequently. If you sell through Shopify, the standard sync updates every 24 hours, but high-volume stores should use more frequent updates through the Content API.
Quick note: if you need to temporarily pull a product (for a few days, not permanently), use the pause attribute instead of setting availability to “out_of_stock.” More on that below.
brand
What it is: The brand name of the product.
Format: Up to 70 characters.
Required if: The product has a clearly associated brand or manufacturer.
Brand is one of Google’s three unique product identifiers (along with GTIN and MPN). It helps Google understand exactly which product you’re selling and match it correctly.
Don’t use placeholder brands. If your product is unbranded or custom-made, leave this blank and set identifier_exists to “false.” A wrong brand is worse than no brand.
For products you manufacture yourself, use your store name as the brand.
Product identifiers: help Google match your products
These attributes help Google identify the exact product you’re selling, which improves matching and can unlock features like product ratings.
gtin (Global Trade Item Number)
What it is: The barcode number for your product. This is the UPC (12 digits) in North America, EAN (13 digits) in Europe, or ISBN for books.
Why it matters: Google reports that products with GTINs get up to 40% more clicks than products without them. GTINs allow Google to match your product to its database, pull in reviews, compare prices, and show your product in more relevant results.
Where to find it: Check your product packaging, manufacturer’s website, or wholesale invoices. If you can’t find it, see my guide on how to find GTIN numbers online.
For custom, vintage, or handmade products that don’t have GTINs, skip this and set identifier_exists to “false.”
For the full breakdown of GTIN formats and requirements, read what is a GTIN and why you need one.
mpn (Manufacturer Part Number)
What it is: The manufacturer’s part number for the product. Especially common in electronics, auto parts, and hardware.
When to use it: When a product doesn’t have a GTIN but does have a manufacturer-assigned part number.
MPN + brand together serve as an alternative to GTIN for product identification. If you have all three (GTIN, MPN, and brand), include all three. More data helps Google.
For more on how MPNs work with other identifiers, see my MPN guide.
identifier_exists
What it is: Tells Google whether your product has standard identifiers (GTIN, MPN, brand).
Accepted values: “true” (default) or “false”
Set this to “false” for: custom-made products, vintage items, handmade goods, store-brand products without barcodes, or any product that genuinely doesn’t have a GTIN, MPN, or brand.
Common mistake: Leaving this as “true” (the default) when your product doesn’t have identifiers. Google will expect a GTIN or MPN and flag warnings when it doesn’t find one.
The flip side: don’t set it to “false” for branded products that should have identifiers. Google will notice the mismatch and it can hurt your product’s visibility.
Categorization and organization: structure your campaigns
These attributes don’t show up in your ads, but they determine how your products are organized in Google’s system and in your campaigns. Getting them right gives you much more control over bidding and performance.
google_product_category
What it is: Google’s standardized category for your product, from their product taxonomy.
Format: Full path (“Apparel & Accessories > Clothing > Dresses”) or numeric ID (2271).
Google will auto-assign categories if you don’t. But I wouldn’t trust the auto-assignment, especially for niche products. A handmade leather phone case might get categorized as “Phone Accessories” when “Leather Goods” would be more accurate for your targeting.
Pro tip: Use numeric category IDs instead of full text paths if you sell in multiple countries. The IDs are universal, while the category names change by language.
The same Google taxonomy works for Bing Shopping and Facebook Product Ads, so the effort you put in here pays off across channels.
For the full guide including how to choose the right category, see my Google product category guide.
product_type
What it is: Your own custom categorization for products, using whatever hierarchy makes sense for your business.
Format: Free text, up to 750 characters. Use “>” to separate levels.
Example: “Home & Garden > Kitchen > Coffee Makers > Drip Coffee Makers”
This is the most underrated attribute in the feed. Unlike google_product_category (which uses Google’s rigid taxonomy), product_type lets you define your own structure. And this structure directly maps to how you can organize and bid on products in your Shopping campaigns.
Use keyword-rich values. Google uses product_type as a relevance signal. “Organic Whole Bean Coffee” as a product type gives Google more information than just “Coffee.”
Use multiple levels separated by “>” to enable granular product groupings in your campaigns. This is especially important for large catalogs where you need to bid differently on subcategories.
For the full strategy on using product type for campaign structure, read my product type attribute guide.
custom_label_0 through custom_label_4
What it is: Five custom fields you can use to tag products with any information that matters for your campaigns.
Format: Up to 100 characters each. Free text.
Custom labels are invisible to customers. They’re purely for you to organize and segment your campaigns. And they’re one of the most powerful tools you have.
How I use them with clients:
custom_label_0: Margin tier (high, medium, low)
custom_label_1: Seasonality (spring, summer, evergreen)
custom_label_2: Performance tier (bestseller, average, underperformer)
custom_label_3: Price range (under-25, 25-50, 50-100, over-100)
custom_label_4: Promo status (on-sale, clearance, full-price)
This lets you create campaign segments like “high margin bestsellers” or “seasonal clearance items” and bid on them differently.
Pro tip: Use feed rules in Google Merchant Center to automatically assign custom labels based on price ranges or other product data, instead of manually tagging every product.
For a deeper dive, read my custom label strategy guide.
item_group_id
What it is: A shared identifier that groups product variants together (different colors, sizes, etc. of the same product).
Format: Up to 50 characters.
All variants of the same product should share the same item_group_id but have unique product IDs. This tells Google that your blue t-shirt in size M, your red t-shirt in size L, and your green t-shirt in size S are all variants of the same product.
When set up correctly, Google can show variant swatches in Shopping results, letting shoppers see available colors or sizes without clicking.
Common mistake: Using the same item_group_id across different products. If your blue t-shirt and your denim jeans share a group ID, Google gets confused about what variants belong together.
Apparel and variant attributes: required for clothing and accessories
If you sell apparel, shoes, or accessories, Google requires additional attributes to properly categorize and display your products. Even if you don’t sell clothing, some of these (like color and material) can improve matching for other product types.
color
What it is: The primary color of your product.
Format: Up to 40 characters. Use up to 3 colors separated by “/” for multi-colored items. Example: “Red/Blue/White”
Required for: Apparel and accessories. Recommended for any product where color influences the purchase (furniture, electronics, jewelry).
The color in your feed must match the color name on your landing page. If your website calls it “Desert Sand,” your feed should say “Desert Sand,” not “Tan.” But in your product title, use common color terms shoppers actually search for.
size
What it is: The size of your product.
Format: Free text, but use standard sizing (S, M, L, XL or numeric like 8, 10, 12).
Required for: Apparel and shoes.
Include size in combination with a size_type (regular, petite, plus, tall, big, maternity) and size_system (US, UK, EU, etc.) to avoid confusion across markets.
age_group
What it is: The intended age demographic for your product.
Accepted values: “newborn” (0-3 months), “infant” (3-12 months), “toddler” (1-5 years), “kids” (5-13 years), “adult” (13+)
Required for: All apparel products. Helps Google show your products to the right audience and filter results correctly.
gender
What it is: The intended gender for your product.
Accepted values: “male”, “female”, “unisex”
Required for: All apparel products. This affects which search results your products appear in. A “unisex” hoodie will show for both “men’s hoodie” and “women’s hoodie” searches.
material
What it is: The primary material or fabric of your product.
Format: Up to 200 characters. Use “/” for multiple materials. Example: “Cotton/Polyester”
Recommended for: Apparel and any product where material matters (furniture, jewelry, home goods).
Material helps Google match your products to specific searches. Someone searching for “silk blouse” won’t see your polyester one if you’ve set the material attribute correctly.
pattern
What it is: The pattern or print on your product.
Format: Up to 100 characters. Example: “Striped”, “Floral”, “Plaid”, “Polka Dot”
Recommended for: Apparel and home decor where pattern influences purchase decisions. Like material, this enables Google to match specific searches like “floral summer dress.”
condition
What it is: The condition of your product.
Accepted values: “new”, “refurbished”, “used”
Required for: All products. Defaults to “new” if not specified, but you should set it explicitly. Especially important if you sell refurbished electronics or vintage items.
Pricing and promotions
sale_price
What it is: The temporary sale price of a product.
Format: Same as price (number + currency code). Must be lower than the regular price.
The sale price strikethrough (showing the original price crossed out next to the sale price) only appears if specific conditions are met:
The base price has been active for at least 30 consecutive days.
The sale runs for 30 days or less.
The discount is between 5% and 90%.
If any of these aren’t met, Google will use the sale price as the regular price and you won’t get the visual strikethrough.
Use sale_price_effective_date to schedule when the sale starts and ends. Format: “2026-03-01T00:00:00-05:00/2026-03-15T23:59:59-05:00”
cost_of_goods_sold (COGS)
What it is: Your cost for the product, used by Google to calculate profit margins in reporting.
Format: Number + currency code. Example: “12.50 USD”
This doesn’t show to customers. It feeds into Google’s profit-based reporting and bidding. If you use a target ROAS bidding strategy, giving Google your COGS data helps its algorithm optimize for actual profit, not just revenue.
I’d recommend setting this for all products if you have the data. The insights in your Google Ads reporting are worth the setup effort.
promotion_id
What it is: Links a product to a specific promotion you’ve set up in Google Merchant Center Promotions.
Format: Up to 50 characters. Must match the promotion ID in your Merchant Center promotions dashboard.
Promotions show as special offer badges on your Shopping Ads (“15% off” or “Free shipping”). They make your ads stand out and improve click-through rate.
If you run promotions regularly, set up promotion_id in your feed to automatically link the right products to the right offers.
installment
What it is: Monthly payment details for products sold on installment plans.
Format: Number of months + monthly payment amount.
Relevant for: High-ticket items where installment payments might influence the purchase decision (electronics, furniture, appliances). Only available in certain countries (check Google’s documentation for current availability).
Shipping attributes
Shipping costs are the #1 reason for cart abandonment. Getting these attributes right ensures shoppers see accurate shipping information before they click your ad.
shipping
What it is: Shipping cost and delivery details for your product.
Format: Country code, region (optional), service type (optional), and price. Example: “US:::5.99 USD” or “US:CA:Ground:5.99 USD”
You can also set shipping at the account level in your Merchant Center settings, which is usually easier than adding it per-product in the feed. Use the feed-level shipping attribute to override account settings for specific products (like oversized items with higher shipping costs).
shipping_weight and shipping dimensions
What it is: The weight and dimensions of the product for calculating carrier rates.
Format: Weight in lb or kg. Dimensions in cm or in.
Always submit weight AND dimensions together. Google uses both to calculate dimensional weight (which carriers often charge for instead of actual weight for large, light packages).
For the complete breakdown of shipping setup options, read my shipping attributes guide.
Visibility and destination controls
These attributes control where and when your products show up.
included_destination / excluded_destination
What it is: Controls which Google surfaces your products appear on.
Options include: Shopping_ads, Display_ads, Free_listings, Local_inventory_ads, and more.
Use case: If a product has a great margin for organic listings but isn’t profitable on paid Shopping Ads, exclude it from Shopping_ads while keeping it in Free_listings.
shopping_ads_excluded_country
What it is: Countries where you don’t want this product to appear in Shopping Ads, even if your account targets those countries.
Use case: You sell internationally but certain products can’t ship to specific countries (regulated items, oversized goods, licensing restrictions).
pause
What it is: Temporarily blocks a product from all destinations for up to 14 days.
Accepted values: “ads_and_free_listings” or don’t include the attribute.
Use pause, not availability, for temporary stock issues. If you’re restocking a product in a few days, pausing it keeps the product in Google’s system without showing out-of-stock errors. Setting availability to “out_of_stock” is for products that are genuinely discontinued or gone for the foreseeable future.
expiration_date
What it is: The date when a product should stop showing.
Format: ISO 8601 date. Must be within 30 days of the last feed submission (or up to 365 days if explicitly set).
Use case: Time-sensitive products (event tickets, seasonal items, limited editions) or products with actual expiration dates (food, cosmetics, supplements).
Note: it takes 4-5 hours for expiration changes to take effect, so plan accordingly.
Enhanced content attributes: stand out in results
These attributes won’t get you disapproved if you skip them. But they can meaningfully improve how your products look and perform.
additional_image_link
What it is: Extra product images beyond the main image. Up to 10 additional images.
Format: Same as image_link (URL to an image file).
Additional images show in the expanded product view when shoppers click your listing. Include lifestyle shots, different angles, close-ups of materials or details, and size/scale reference images.
The rules are slightly more relaxed than the main image. Additional images can show products in context (on a model, in a room), though they should still be high quality and relevant.
lifestyle_image_link
What it is: An image showing the product in use or in a lifestyle context.
Format: URL to an image, minimum 600x600px.
This image is used in Display, YouTube, and Performance Max campaigns, not in standard Shopping Ads. If you’re running PMax (and most ecommerce advertisers should be), lifestyle images give Google better creative assets to work with.
Show the product being used by a real person in a realistic setting. Not a white-background studio shot.
product_highlight
What it is: Short bullet points highlighting key product features.
Format: 4-6 highlights, each up to 150 characters.
These appear in free product listings and help shoppers quickly scan product features. Best for products where specs matter (electronics, appliances, camera equipment) or where material/construction details influence the purchase.
Write these as scannable benefit statements, not marketing copy. “100% organic cotton, pre-shrunk” works. “Experience the incredible softness of our premium fabric” doesn’t.
short_title
What it is: A shorter version of your product title for Display placements.
Format: Recommended 65 characters, max 150.
Your full product title might get truncated on smaller ad placements. The short title gives you control over what shows when space is limited.
Keep it to the essentials: brand, product type, and the one or two most important distinguishing features. Don’t include variant info (color, size) as the short title represents the base product.
is_bundle
What it is: Indicates the product is a merchant-defined bundle (multiple distinct products sold together).
Accepted values: “true” or “false”
Use this when you sell a group of products as a single unit (like a camera body + lens + bag kit). The bundle must have a single price and a single landing page. Each individual product in the bundle should also exist as its own listing.
Don’t confuse this with multipacks (same item x quantity) or variant groups.
adult
What it is: Flags a product as adult-oriented content.
Accepted values: “true” or “false”
Set this to “true” for: products with sexual or mature content. These products will only show in results when the searcher’s SafeSearch is turned off.
Not setting this when it’s needed can result in account suspension. When in doubt, err on the side of caution.
What to optimize first
With 60+ attributes, it’s easy to get overwhelmed. Here’s the priority order I use with my clients:
Level 1: Fix the basics
Get all required attributes right. Fix all disapproved products. Make sure prices, availability, and images match your landing pages.
Level 2: Optimize for relevance
Improve your product titles with keyword-rich, structured formats. Add detailed descriptions. Set up google_product_category and product_type correctly.
Level 3: Organize for campaign control
Set up custom labels based on margin, seasonality, and performance. Use item_group_id correctly for all variants. Add product identifiers (GTIN, MPN, brand) wherever possible.
Level 4: Add competitive edges
Submit additional images and lifestyle images. Add product highlights. Configure shipping attributes accurately. Set up sale prices and promotions.
For the full walkthrough on optimizing your feed step by step, read my product feed optimization guide.