The importance of people that have been to your website before but didn’t buy shouldn’t be underestimated. After all, they were interested enough in what you offer at some point, so there might still be a chance of converting them.
And Remarketing allows you to do exactly that.
The two most popular ways to configure remarketing audiences are through Google Ads and Google Analytics.
In this article, we’ll focus on remarketing audiences in Google Analytics. (Click here if you’d like to learn more about Google Ads remarketing audiences).
We’ll walk you through the whole setup, and show you how you can leverage the Google Analytics audiences afterward.
Let’s get started!
Table of Contents
Remarketing With Data Sourced Through Google Analytics
Remarketing can be subdivided into 2 different approaches, static and dynamic.
The main difference between the two is that Dynamic Remarketing is more powerful, but also requires more configuration than Static Remarketing.
Static Remarketing
Static remarketing, also known as non-dynamic remarketing, is the traditional way to target past website visitors. This is how it works.
- The ad is generic – usually, it takes users to a landing page (same for all visitors).
- You set it manually – meaning you choose the layout and content of the ad (even if there is more than one version of the same ad).
- The focus is on the business – since you don’t know what products a visitor has looked at, the ad focuses on the business
In a way, static remarketing serves generic ads to anyone who has visited your site. While some users will engage with these ads, others will pass because the ads are not specific enough.
This is banner blindness in action. If you manage to show an ad for something they have looked at, you have an opportunity to break through this blindness.
Dynamic Remarketing
Dynamic remarketing is personalized and serves ads that are more relevant to users. The specifics are as follows:
- The ad is relevant – it’s highly personalized and it uses data from the product feed to show the exact product this user searched for.
- Google does it for you – the ad copy and layout are chosen by Google, based on signals about the online behavior of the individual user and your product feed.
- It’s about the buyer – everything pivots around the customer (“I’ve learned you’re interested in this product, so have a look at what we offer”).
- It’s based on site behavior – it rests on user data collected by the remarketing tag, which is then matched with info from the product feed.
Generally speaking, conversion rates are much higher with dynamic remarketing because the ads are better targeted.
Example of the Different Remarketing Options
Here’s a scenario of how this would work in practice. Say someone visited your site and they looked at a few product pages of mountain bikes that you sell.
With static remarketing, they’ll be shown a generic ad about mountain bikes.
With dynamic remarketing, on the other hand, Google knows exactly what products a visitor has looked at through the product IDs. So it’s able to show that visitor ads about specific bikes they looked at.
How does all of this pertain to creating remarketing audiences sourced through Google Ads and Google Analytics data, respectively?
Setting Up Remarketing Audiences (Google Ads vs Google Analytics)
The difference stems from the way remarketing data is sourced:
In Google Ads, you build remarketing lists from the data collected by the remarketing tag. In Google Analytics, you build remarketing audiences from any of the data you have in Analytics.
So, if you want to do static remarketing, you just need to link your Google Ads with your Google Analytics account. This is easy to do and we cover it in detail below. Once you link both accounts, you can select an audience in Google Ads and use it in a campaign.
If you’d like a more detailed comparison between the two approaches, check our Google Ads vs Google Analytics Remarketing article.
Now, let’s go over the whole process of creating remarketing audiences in Google Analytics, step by step.
How To Create Remarketing Audiences in Google Analytics
Let’s see how you can link your Google Ads and Google Analytics accounts, and how to define dynamic attributes for remarketing audiences in Google Analytics.
This is the part that’s a little more complex. There might be a bunch of things that you haven’t heard of before, so just follow the steps and you should be fine.
Out of the box, Google Analytics only knows about which URL a visitor has been on.
It’s not able to “understand” what was on the page.
So if we want to show ads with the specific products a person has looked at, we need some way to tell Google Analytics about what’s on the page.
These are extra variables that we need to add to every page.
Here is how that works in practice:
- Enable Remarketing Features
- Create custom dimensions
- Modifying the existing Google Analytics tracking code
- Defining Dynamic Attributes
- Create audiences based on these attributes
1. Enable Remarketing Features in Google Analytics
This first step is simple. You need to change the settings in your Google Analytics account to allow for data to be shared with other advertising accounts.
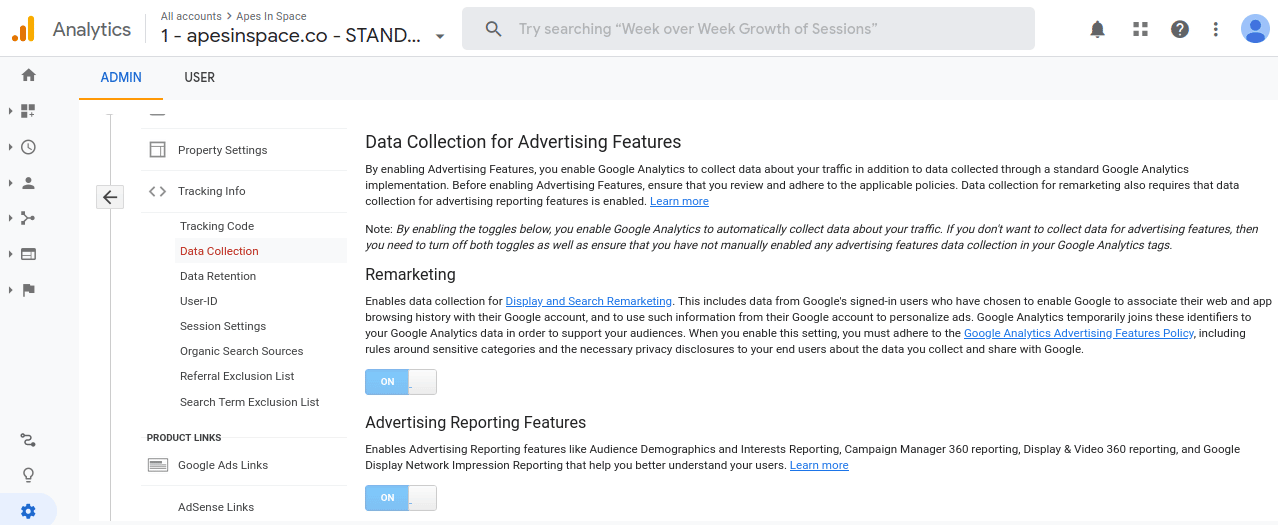
Make sure you enable remarketing features in Google Analytics. Select the Admin menu > Tracking Info > Data Collection, and then just turn these functions “on.”
It’s also recommended to enable personalized advertising so you can use dynamic remarketing to target Google users.
Once that’s done, you need to define custom dimensions and dynamic attributes, so let’s take a look at this in the next section.
2. Define Custom Dimensions (in Google Analytics)
A custom dimension is a new variable that we’re creating inside Google Analytics.
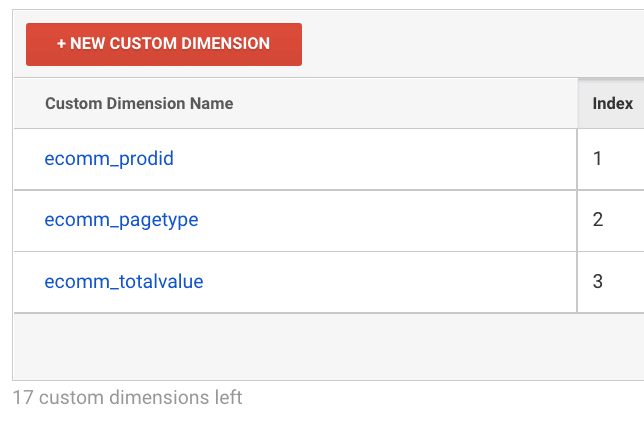
For Remarketing, we’ll create 3 new variables:
- ecomm_prodid
- ecomm_pagetype
- ecomm_totalvalue
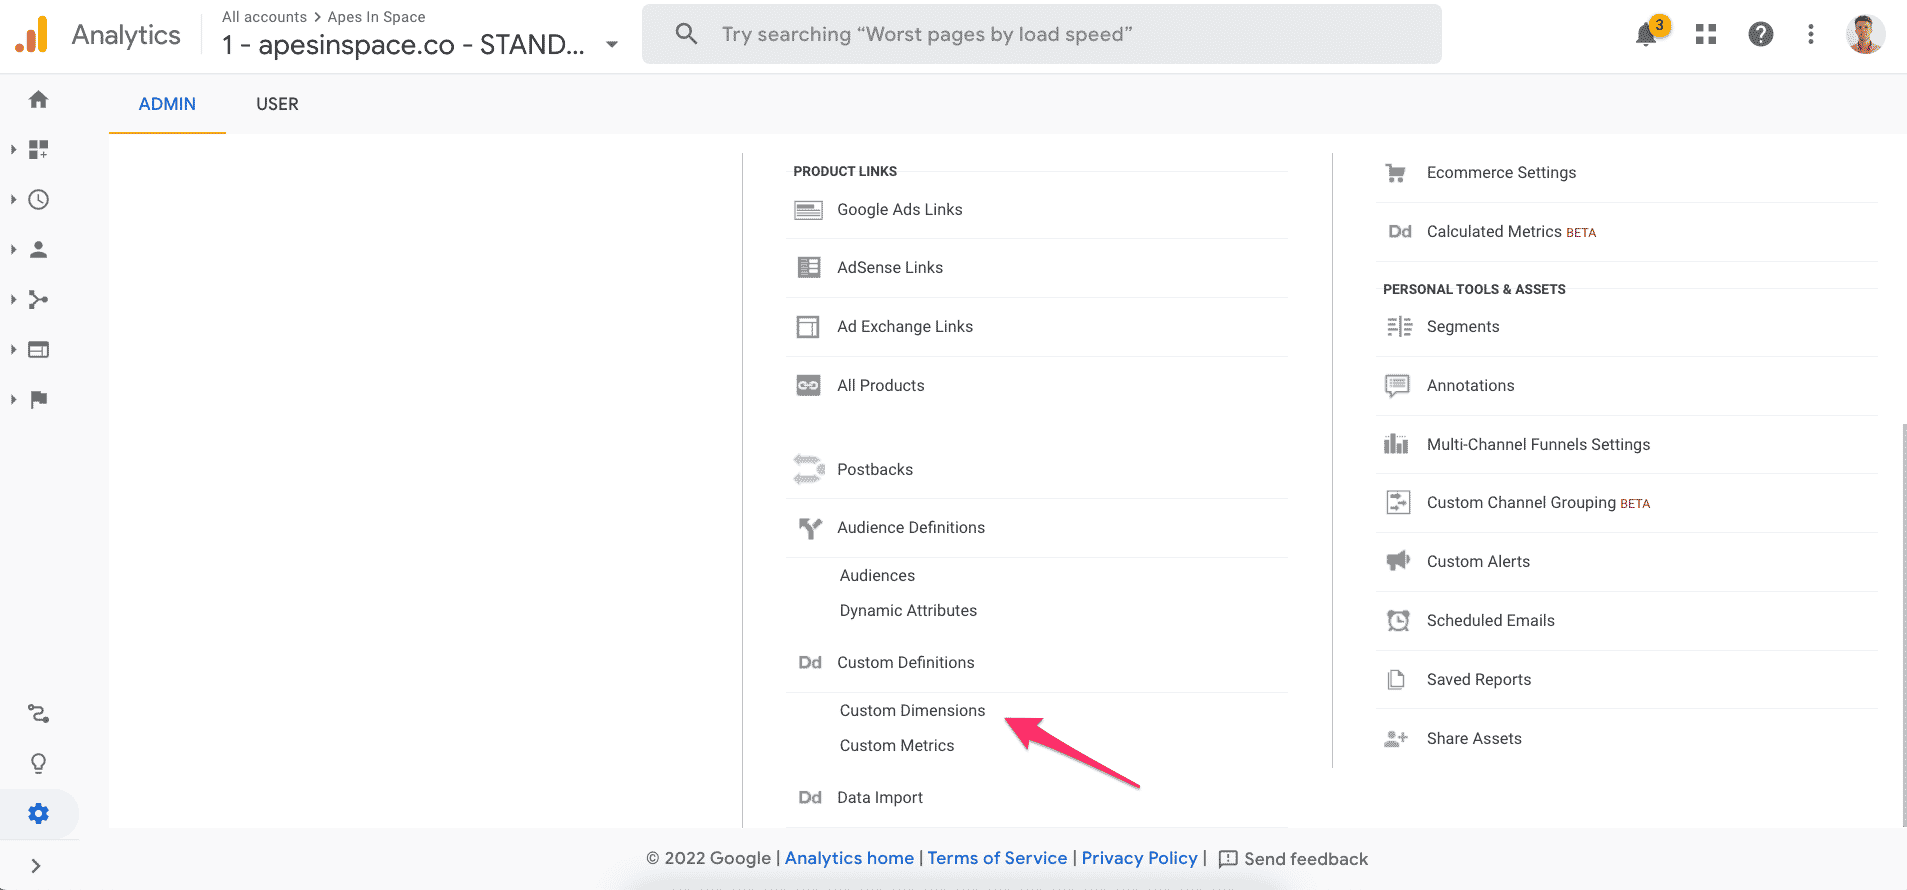
To set them up, go to the Admin section > Custom Definitions > Custom Dimensions > New custom dimension
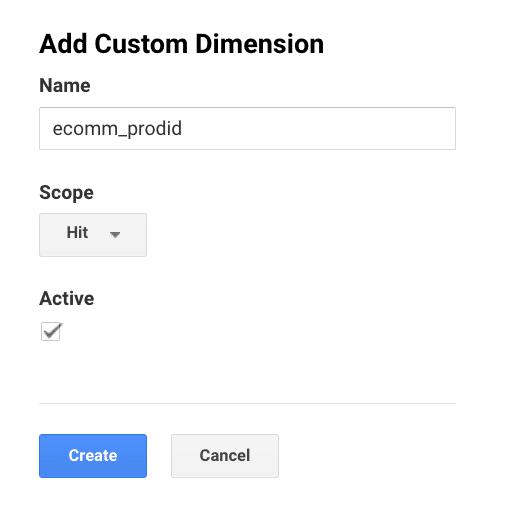
Here you can define what the variable will look like.
You have to provide a name and set the scope for this custom dimension.
Click create and repeat for the 2 other variables.
3. Modify Google Analytics Tracking Code
Now that we’ve created the new custom dimensions (=variables), we need to make sure that we’re sending those values from our website to Google Analytics.
To do that, we need to modify the Google Analytics tracking code.
Here are the instructions you’ll see in Google Analytics:
For every new variable, we need to add 2 extra lines of code.
Both with our variable name + the dynamic code to send it in your ecommerce cart.
Here is for example the code I would add if I was on Shopify:
var ecomm_prodid = ‘shopify_US_{{ item.id }}_{{ item.variant.id }}’;
ga(‘set’, ‘dimension1’, ecomm_prodid);
If this is making your head spin, stop here and get someone else involved that’s more technical!
Now, let’s move on to defining dynamic attributes.
4. Define Dynamic Attributes (in Google Analytics)
Now that we have the new variables, and we’re sending the data from our ecommerce platform to Google Analytics, it’s time to revisit the definitions.
Amongst all the custom dimensions you can create, the ones you create for remarketing are a little special.
So to take advantage of the additional functionality, we need to define the dynamic attributes.
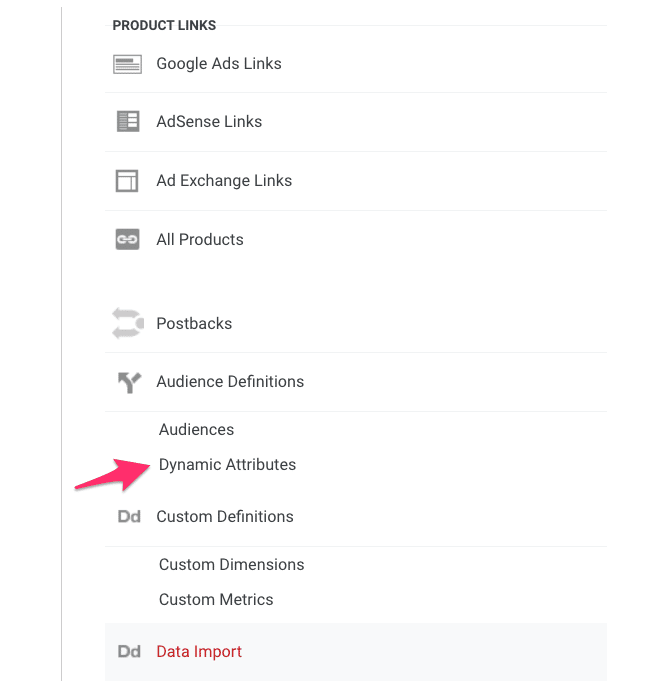
In Admin > Audience definitions > Dynamic Attributes
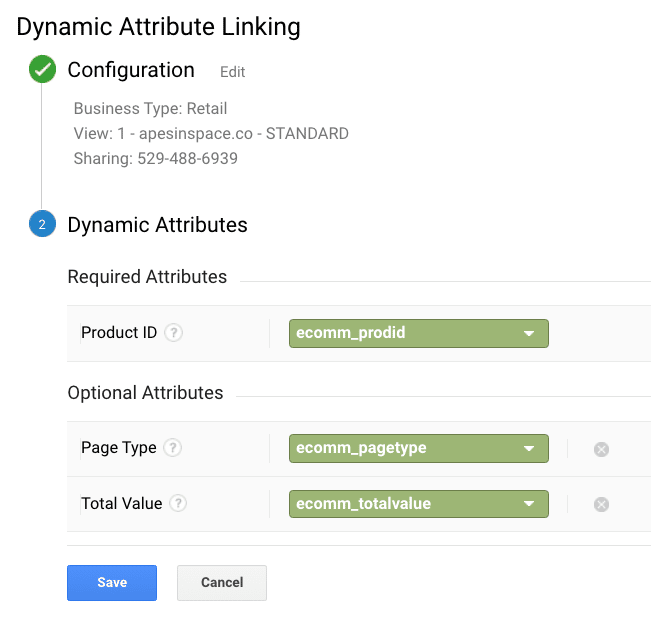
There you select the Google Ads account you want to link with and link the 3 pre-defined Dynamic Attributes: Product ID, Page Type, and Total Value.
Hit Save and you’re done.
The most important part is that the Product ID needs to match with the ids inside of Google Merchant Center.
5. Leveraging Dynamic Attributes In Audiences
At this point, all Google Analytics audiences are leveraging Dynamic Attributes.
So you can either use your default Audience: “All users (Google Analytics)”, or create more specific ones.
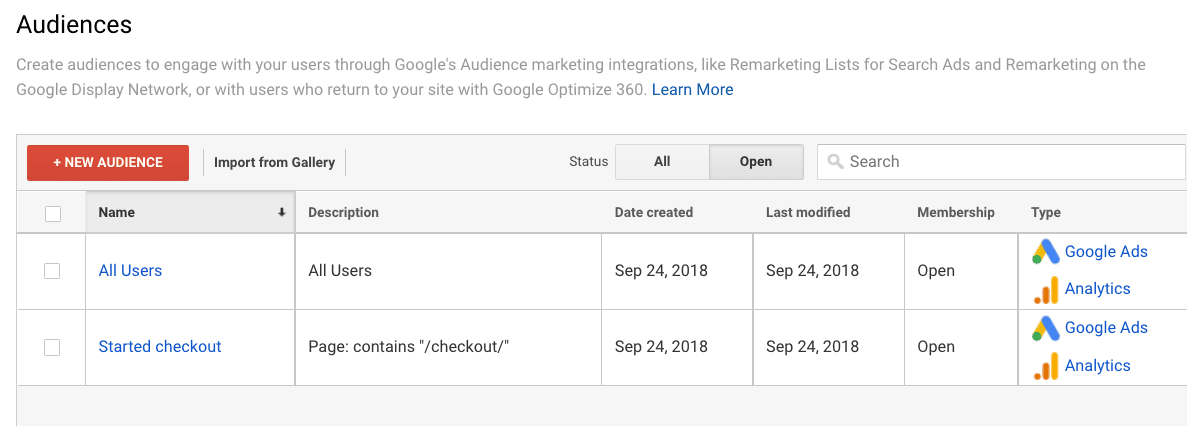
To do that, go to the Admin > Audience Definitions > Audiences menu
The technical part is now done, so it’s time to get the creative juices flowing on which audiences you want to create.
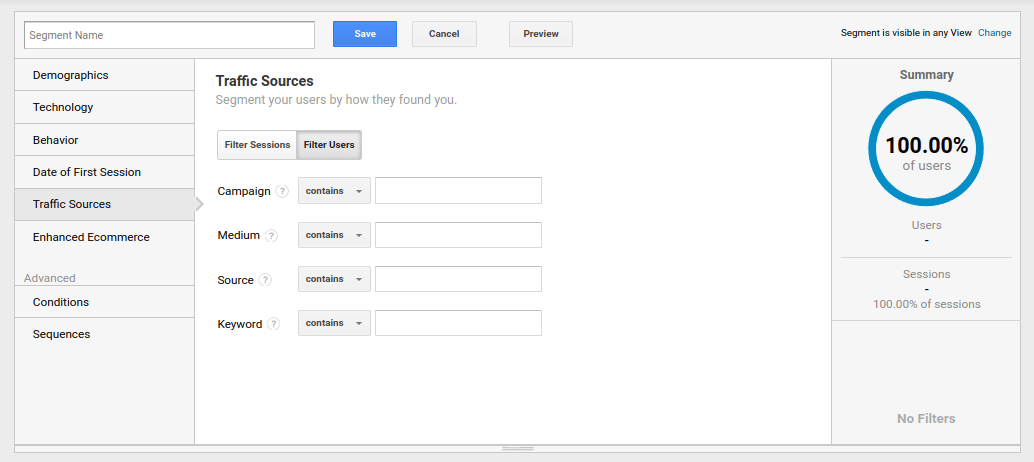
To create a new Audience, you first have to define a new segment in Google Analytics.
The options here really are endless with every possible combination of all metrics available inside of Google Analytics!
You can filter website visitors based on demographics, online behavior, traffic source, etc.
Example audience #1: Product viewers
Say you want to target past visitors of a specific product page. Google Analytics allows you to set conditions and sequences to create this “Product viewers” audience.
In this example, the variable would be users who visited a page (or pages) during their session, and the condition is that it contains the word “product.” You use slash (/) to specify the value, so if the product is sneakers, enter “/sneakers/.”
Example audience #2: Multiple conditions
Customization depends on conditions and sequences, especially when you are a beginner.
The conditions can be stacked on top of one another following an “or” or “and” logic.
If needed, you can also exclude a group of users from the audience segment. For example, those who visited the “Career” or “Jobs” section of your website are likely interested in working for you instead of receiving a remarketing-driven advert that makes a dent in your ad budget.
To do this, set the filter to “Exclude,” select “Sessions”, and eliminate the users who visited a page, which contains “Careers” during their session.
6. Link Your Google Ads and Google Analytics Accounts
Linking your accounts is a straightforward process, and there are two ways to do this, inside Google Analytics or inside Google Ads.
You only need to set it up in one of the systems so feel free to pick your favourite!
Linking the Accounts in Google Ads
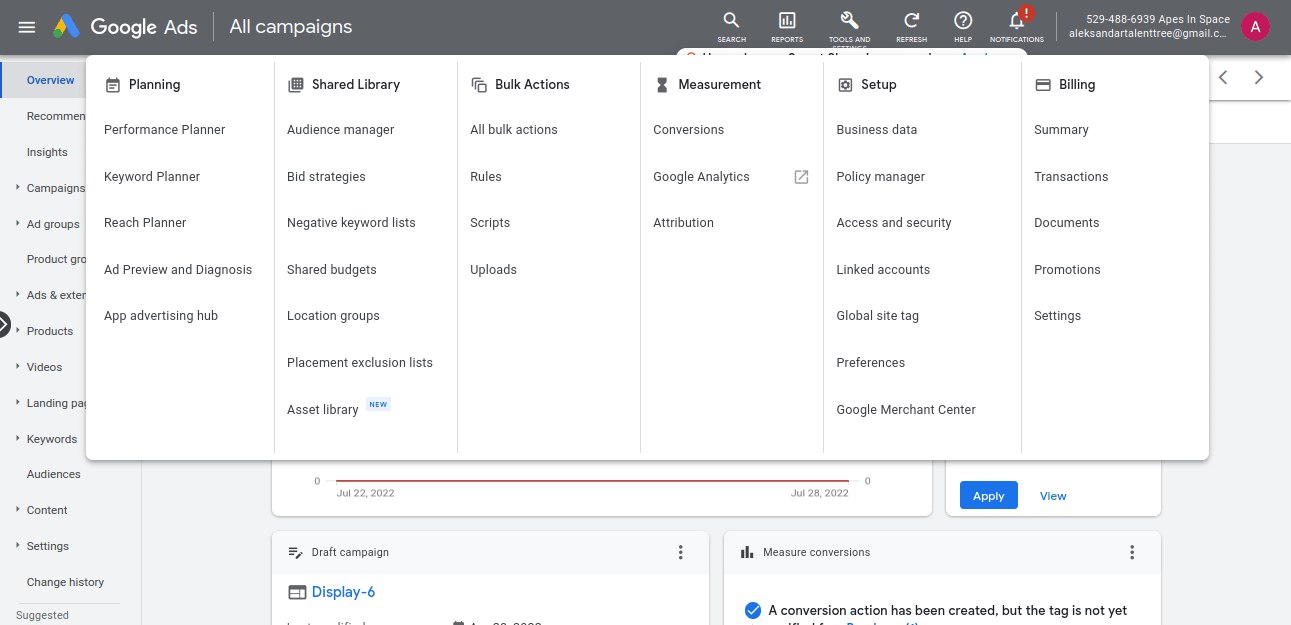
Once you log into your Google Ads account, go to Tools and Settings > Setup > Linked Accounts.
You will get a list of all linked accounts. If Google Analytics is not on that list, you can use the search bar to find it.
Click on “Linked Accounts” to access a list including all linked accounts.
Check the value in the column “Status” – if your accounts are linked, it will show (as on the screenshot).
Linking the Accounts in Google Analytics
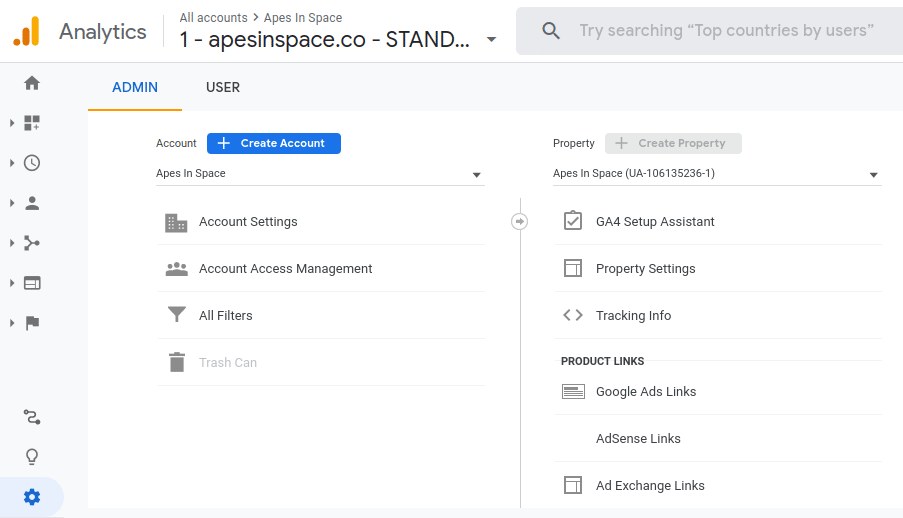
You can do the same in Google Analytics. Enter the Admin menu, check Product links in Property, and click on Google Ads Links.
If your Google Ads and Google Analytics accounts are linked, you will see this table.
Please note that both methods work and you don’t need to do this in both Google Ads and Google Analytics, so choose one and you’ll get the job done.
The goal is to share audience lists and remarketing events (or parameters) between the two accounts, and it doesn’t matter where you do it.
Finding These Remarketing Audiences in Google Ads
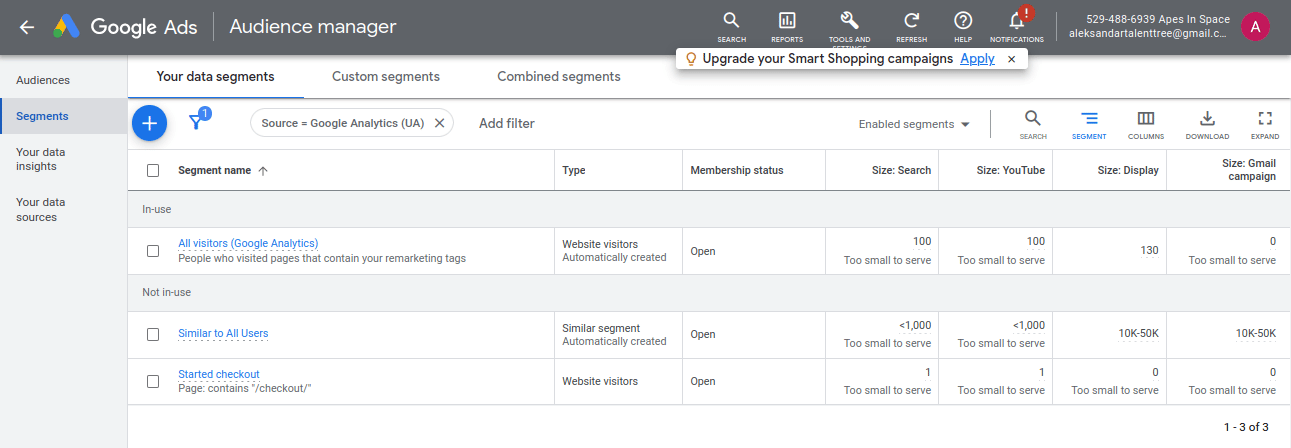
Once you create it, this remarketing audience will end up as an audience segment in Google Ads. You can find them by selecting Tools and Settings> Shared Library > Audience manager.
In the screenshot above, you can see how audience segments created in Analytics show up in Google Ads.
The segment at the bottom (Started checkout) was customized: the variable is “page session,” the condition is “contains”, and the value is the word “/checkout/”.
Then, you can select them for different campaigns and ad groups.
Universal Analytics vs Google Analytics 4
Some of you use Universal Analytics (UA or GA3), while others use Google Analytics 4. The process for linking Google Ads with Universal and GA4 accounts, respectively, is similar, though the steps might slightly differ. The good news is that you can still use both UA and GA4 in Google Ads.
Adding Google Analytics Remarketing Audiences to a Google Ads Campaign
Here is how you add a Google Analytics remarketing audience to one of your Google Ads campaigns.
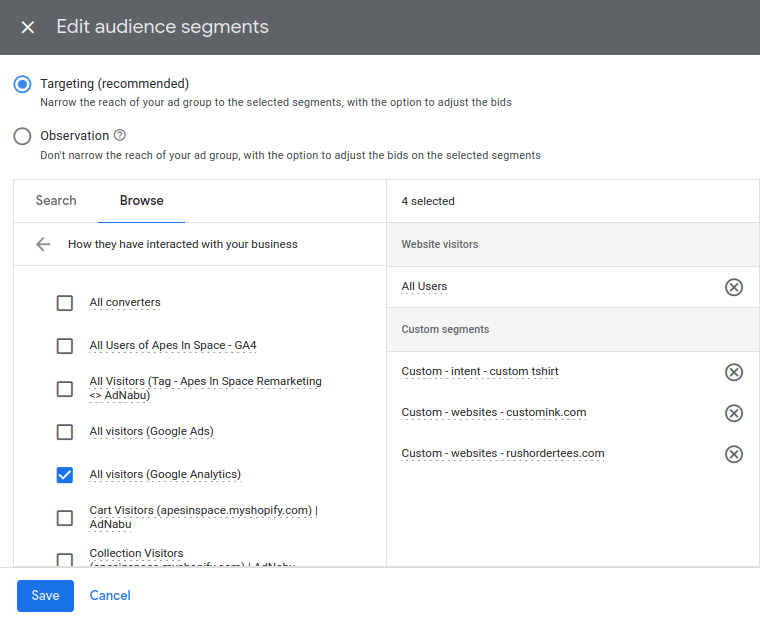
First, select your campaign (or ad group). Then click “Audiences” and click “Edit Audience segments” > Browse > “Your data and similar segments.”
Depending on the audiences in your library, you can see custom combination segments, website visitors, YouTube users, etc.
The Google Analytics remarketing audiences are listed under website visitors, usually alongside Google Ads remarketing audiences.
Audience Size Matters For Rule-Based Remarketing Audiences
Audience size is critical for Remarketing campaigns. The minimal list size before ads can show with Search and Shopping campaigns is 1000 users. With Display Ads, you need fewer people and your ads can already show when you have a minimum of 100 users in an audience segment.
So if you don’t want to see the “Too small to serve” label for your audience segment, you’ll need to balance between precise targeting and wide reach.
This task becomes easier as you learn how to use remarketing audiences.
How To Use Google Analytics Remarketing Audiences
Here are some ideas on using your Google Analytics Remarketing audiences.
- Cart abandoners – these are the users who put one or more of your products in their carts but didn’t proceed to checkout. They might, however, complete the transaction if you give them a nudge. Target them with ads showing a discount or some other perk.
- Product viewers – or the users who opened a product page on your website but their carts remained empty. Target them with an ad showing the exact product they checked out during their session.
- Past customers – these are the users who bought from you in the past. The method is also known as cross-sell, or an effort to create a returning customer. Target them with ads about similar or complementary products (if applicable in your industry).
- Exclude overlapping audiences – there are many groups of users you can exclude from the audience segment to stop wasting ad money, like your employees, job seekers, etc. If you don’t target them, just make sure you add a condition that eliminates them from the rule-based audience.
Here are a ton of extra ideas for audiences you can create inside of Google Analytics.
Google Analytics Remarketing Audiences Will Boost Your Performance
The setup is a lot more technical compared to remarketing through Google Ads tags.
But in return, you get a ton of extra flexibility for which audiences you can come up with.
You can use conditions and sequences to filter website visitors and create custom remarketing lists from the user data. Although this may seem demanding, it gets easier as you test out different lists.
When you add these audiences to your Google Ads campaign, you can use the usual optimization tweaks to improve campaign performance.
Remarketing changes continually, so use every leverage you can to make the most of these lists, be that layering audience segments or excluding users who better not spend your ad budget.
Ultimately, it’s all about putting Google Analytics data to good use in a Google Ads campaign.
