I feel like I need to start by explaining why I’m writing this post.
Google Ads has been around for more than 20 years! 🤯
There have been tons and tons of blog posts, ebooks, courses, training, videos on how to set up Google Ads campaigns.

So why repeat something that has been done 185 thousand times before?
Despite the abundance of resources, I still see WAY too many online stores screw this part up.
They fall prey to basic mistakes during their setup that simply make it impossible to ever turn a profit.
And if you don’t even know that you’re doing something wrong, your Google Ads future doesn’t look bright.
That said, I won’t rehash the same old dribble with my own spin.
The last couple of years Google Ads has changed how it looks and works, making it a perfect time for an update.
In this post, I’ll show you how I set up Google Ads campaigns for the store I started.
Where To Start
Here is what you need to get started:
- A Google Ads account (if you don’t have one, go sign up here and ask your promo code in the comments of this post)
- All your keywords sorted into themes
In the first post of this little series, I’ve talked about doing keyword research for Google Ads. If you followed that, you should have something resembling the spreadsheet below:
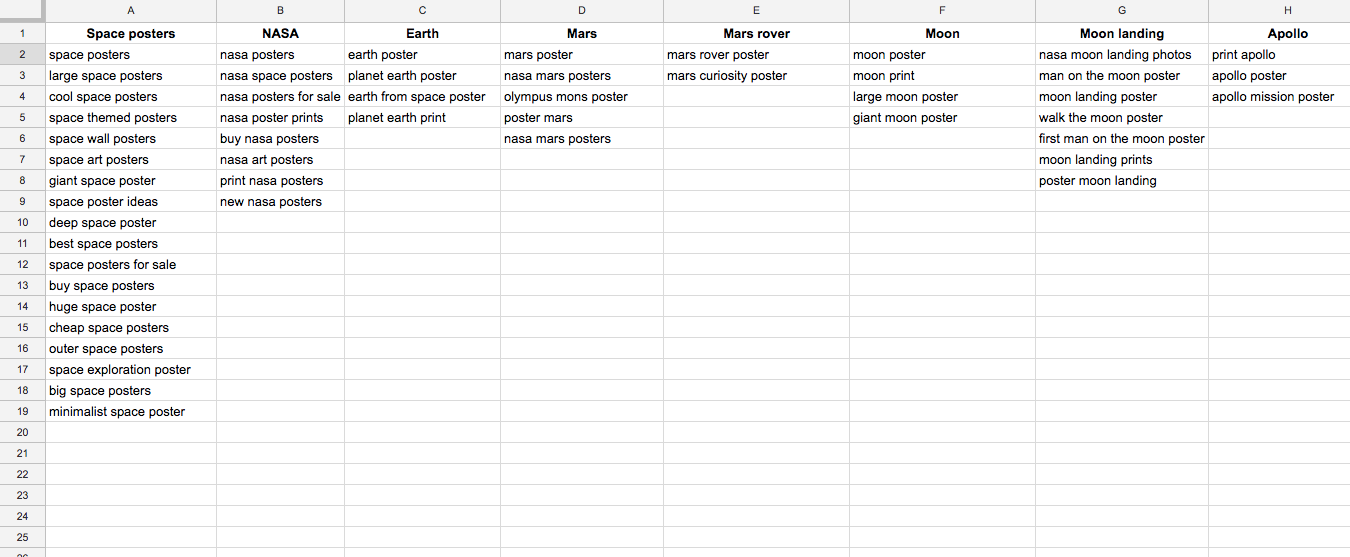
A number of different columns with closely related keywords.
Reading and doing the work in that article makes the approach described in this post a lot faster.
Here is an outline to make it easier to follow along. Click any of the links below to skip to the right section:
- Creating your campaign
- Setting up ad groups
- Adding the keywords + match types
- Setting the correct bidding
- Create poppin’ ads
- Adding ad extensions
- Adding negative keywords
- Last settings check
- Link Google Ads & Google Analytics
- Campaign launch
Bonus: Don’t just “start” a Google Ads campaign. Grab our free 6-page worksheet to come with a strategy that is (almost) guaranteed to make money!
Step 1: Creating your campaign
Google Ads has a couple of different types of advertising campaigns: App, Display, Discovery, Local, Performance Max, Search, Smart, Shopping, and Video.
Our goal in this article is to create text ads that will appear in the Google search results, so we’ll focus on creating ads for the Search Network.
If you create a new campaign, Google Ads will sometimes opt you into the Display network as well.
Make sure you opt out of the Display network, this is where a lot of stuff goes wrong. Your own screen should look like this:
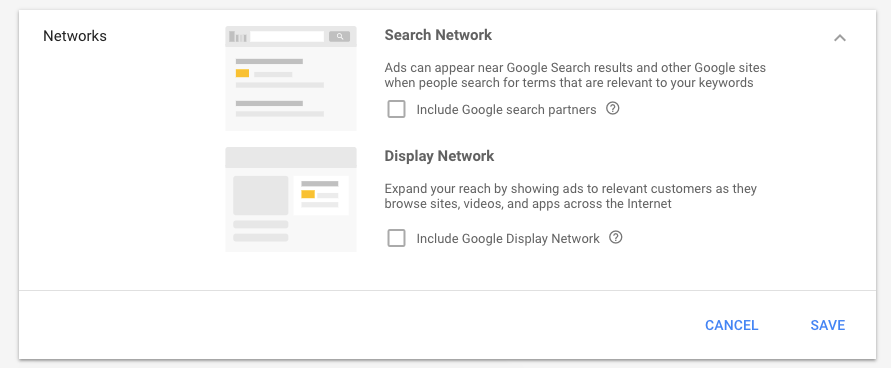
If you’re starting out, don’t include the Google search partners. These partners can offer a good opportunity to expand your volume, but they also complicate your campaigns.
How many search campaigns should you have?
That depends on your store. But here are a couple of ideas that I usually use for my clients:
- Campaign for your own online store brand (if you have some volume)
- Campaigns for brands / branded products
- Campaigns for specific categories
- Campaigns targeting different regions
- Campaigns targeting different languages
In what follows, I’m using my Apes In Space online store as an example. Since I don’t have any famous brands or branded products, I’m creating one campaign that targets space related queries in the US.
Step 2: Setting up ad groups
Thanks to the preparation you did in the previous post, setting up the ad groups goes pretty fast.
Basically every column becomes an I went with modified broad match keyword ad group.
To me, that meant 14 ad groups:
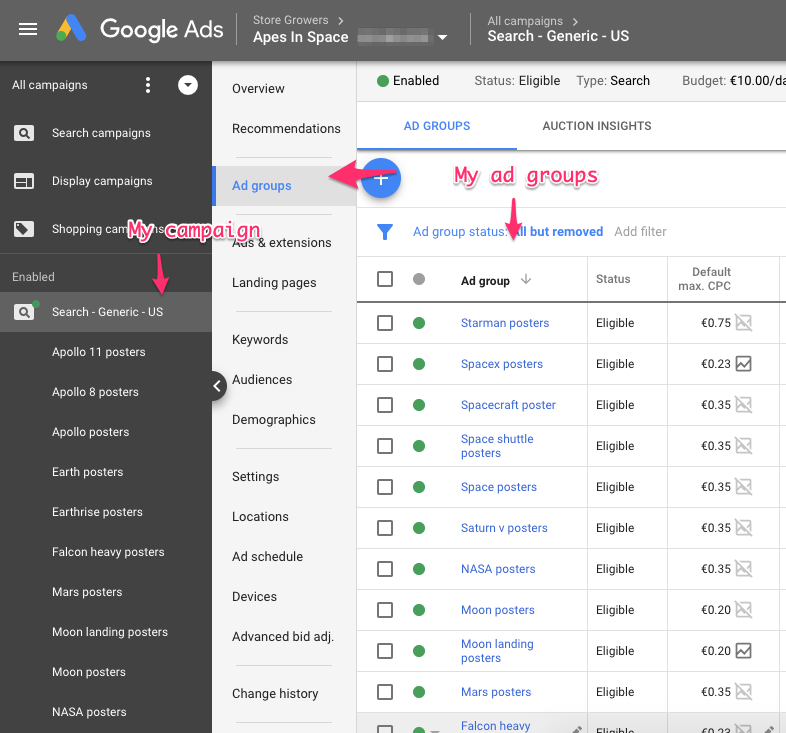
To set these up you can use the Google Ads interface.
If you have a lot of campaigns or ad groups to set up, check out the free Google Ads Editor. That helps to make bulk changes.
Step 3: Adding the keywords + match types
From our keyword research. We’ve found the actual search queries that people are using.
But to add them to their specific ad group, we need to pay extra attention.
To show the danger, let’s take a look at one of Google’s instructional videos:
Seems very straight forward right? But if you pay close attention to the video, you can see that it already contradicts some of the recommendations I made before (like picking the right network).
In the case of keywords, the video makes it seem like adding the actual keywords is enough.
But an important part of effective Google Ads campaigns is that you need to tell Google Ads how closely they should stick to the keywords that you provide. Do you want our ads to appear for misspellings, synonyms, related words, etc?
In Google Ads you can do this with keyword match types.
Google Ads has 4 different match types:
- Broad match: default and a lot of freedom to Google to decide
- Modified broad match: stick to small variations
- Phrase match: stick to this queries that contains these words in order
- Exact match: only show ads for this specific search query
So when I talk about a keyword in Google Ads, I actually mean the words and its match type.
For example +space +posters and [space posters] are two different keywords.
The first keyword could show up for a query like: “buy space posters for classroom”. The second keyword would only show up when people search for “space posters”.
You can go as detailed as you want. The extreme would be creating 3 different keywords for each of the words we added (each of the match types).
I usually try to find a good balance between the volume I expect and the effort it takes to set this all up.
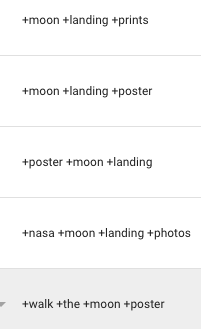
So in this case I went with modified broad match keywords. That will give me a feel for the volume and will show me some other keywords that Ii haven’t found in my research.
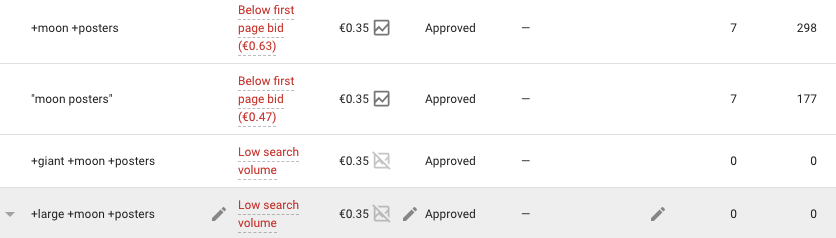
Here are some of the keywords in the Moon posters ad group:
If your budget is really limited, you can also start off with just phrases or exact match keywords. That way you make sure you only appear for searches that you want.
The downside is that you won’t discover any new interesting keywords (that are potentially cheaper).
Tip: if you need to add a lot of different keywords, you can use a tool called mergewords this allows you to create a ton of keywords with their appropriate match types.
Step 4: Setting the correct bidding
This might sound like a complicated step. (It’s sometimes also called bid strategy or bid management)
But it basically means that you need a plan about why you’re putting the max CPCs at the amount that you do.
Example: bid strategy when you’re starting out
Action: Set every ad group at a max CPC of $0.35
Reason: you don’t know what a click actually costs, how many clicks you’re going to get etc.
This is how I started out with the Apes In Space Google Ads campaigns, everything at $0.35.
Example: bid strategy for more visibility
Then after a couple of days, you might see that some ad groups aren’t getting ANY traffic.
As was the case with my own campaigns.
So your “bid strategy” might become:
Action: increase the max CPCs of all ad groups to $0.5
Reason: you want to bid higher to show up in more search results.
Example: bid strategy to increase sales
One month into your campaigns, there might be some ad groups that get sales, why others get nothing.
Action: Increase max CPCs by 20% for the ad groups that are making sales
Then after a couple of months, you can get into a lot more advanced strategies like optimizing for a specific position for some campaigns, while others are focused on achieving a specific CPA or ROAS (return on ad spend).
The important thing is to have a plan, no matter how simple it is.
You can adjust the max CPC both on the ad group or keyword level. But to keep it simple, start by setting max CPCs on the ad group level. Then when you learn about how keywords perform differently, you can start adjusting them on that level.
Step 5: Create Poppin’ Ads
Setting up Google Ads campaigns can be a time-consuming task. So when it’s time to create the actual advertisements, many people phone it in.
But I’ve found this is the part that can help make or break your campaigns.
If you’re in very competitive markets with giants like Amazon bidding against you, having great ads can really help you stand out. They have millions of ad groups to manage, so they’ll rely on automation.
If you take the time to come up with ads that really hit on the needs or problems or challenges of your target customer, you can get more clicks on your ads.
Let’s look at two ad examples: one very custom one, and one generic one.
Example 1: The Search Ad That Connects To Secret Desires And Objections
Coming up with ads that are specific and relevant to a very specific set of keywords takes time.
Take this example from SkinnyMint detox tea:
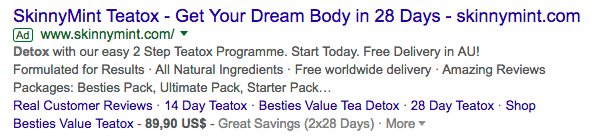
The first objective of an ad is to show that you’re actually selling the product that a customer is looking for.
But this ad goes way beyond. It shows that they understand the desires and concerns of their potential customers:
- They want to lose weight/look better quickly = “Get Your Dream Body in 28 Days”
- They are concerned with what they’re putting in their body = “All Natural ingredients”
To create these types of ads you need to know your customers well, which requires research.
The approach above works if you’ve got a limited amount of products (the brand above only has like 5 SKUs).
Otherwise, it probably won’t be cost-effective to repeat the research for every product/category that you’re selling.
Example 2: The Quick And Dirty Ad Template
A different approach is the quick and dirty ad template.
It basically is a generic ad that you can re-use in multiple ad groups at once and adapt slightly.
Check this example from Buildasign:
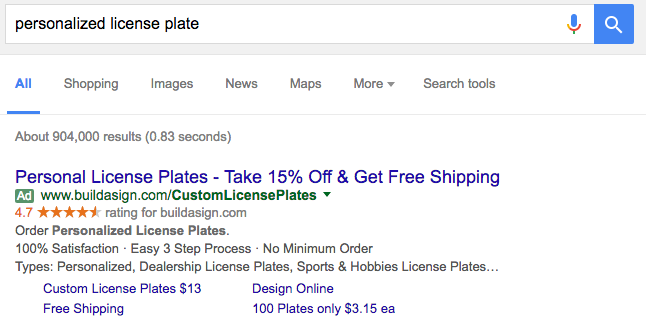
They’ve got a basic template with the store USPs: Take 15% Off, Free Shipping, 100% satisfaction, No minimum order, Easy 3 step process.
But they don’t talk about why someone might desire a personalized license plate.
You can see that it stays on the surface.
The ad is not going to create an urgent desire for a customized license plate, but their offer is pretty good.
So it’s not a bad approach to get started, I often use it when I need to create a ton of ads at the same time.
I used this approach for my own campaigns:

But if some ad groups get a lot of clicks, I will revisit them in a few weeks and come up with ad variations that are closer to the first example.
Because if it is a lot of work, you can be certain that few of your competitors will put in the work required.
Pro tip: create 2-3 ads for each ad group. If you have multiple ads in each ad group, the people that see your ads will actually tell you which ad speaks more to them. You’ll see this reflected in your clickthrough rate or CTR.
Once a clear winner emerges, pause the other one and try to come up with a better version.
Step 6: Adding ad extensions
Ad extensions are extras that allow you to claim more real estate in the search results.
Here is an example from Alibaba:

You can’t choose which specific ad extensions types show up for a specific search. All you can do is provide as many of them as possible and Google will choose which ones it displays depending on the search query and the position your ad will show up in.
Google Ads gives you the options to set ad extensions on the account, campaign or ad group level, which can really help for people to discover your whole product catalog.
Let’s quickly run through the current ad extensions:
- Sitelinks: add extra links to your website (be sure to provide the 2 description lines!)
- Callout extensions: add your store’s USPs
- Structured snippets: show more about your offering: brands/models/types
- Location extensions: add your existing physical locations
- Call extensions: Add a telephone number
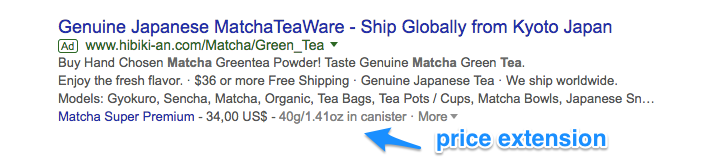
- Price extensions: show actual products with actual prices
- Promotion extensions: show special promos you’re offering
- Seller ratings: show your store’s rating
The ones that show up most often are sitelinks and callout extensions. So make sure you definitely add them.
The seller ratings work a bit differently. These will show up automatically if you’re using a third-party review service that Google supports and have enough reviews. If you’re with a different provider, be sure to reach out to them, because Google has a big backlog in enlisting new providers.
Here are the ad extensions that I set up for my Google Ads campaign:
- Sitelinks to every category of my store
- Callout extensions with the biggest USPs
- Structured snippets with the types of posters that I sell
Google Ads is also always experimenting with new features. So your account might very well have some new features that are missing from this post.
Step 7: Adding negative keywords
Negative keywords can save you a lot of money upfront.
These are keywords that you add to your campaigns where you explicitly tell Google Ads NOT to show your ads if people search for them.
These could be searches for products or brands you don’t sell, competitor stores, more informational queries, etc.
There are two ways to discover these keywords:
1. From your keywords research you did before
In my keyword research I saw a lot of searches for a series of posters that NASA released. Most of these people are looking for the free versions of these posters.
Since these aren’t likely to be good customers, I wanted to exclude them from my campaigns:
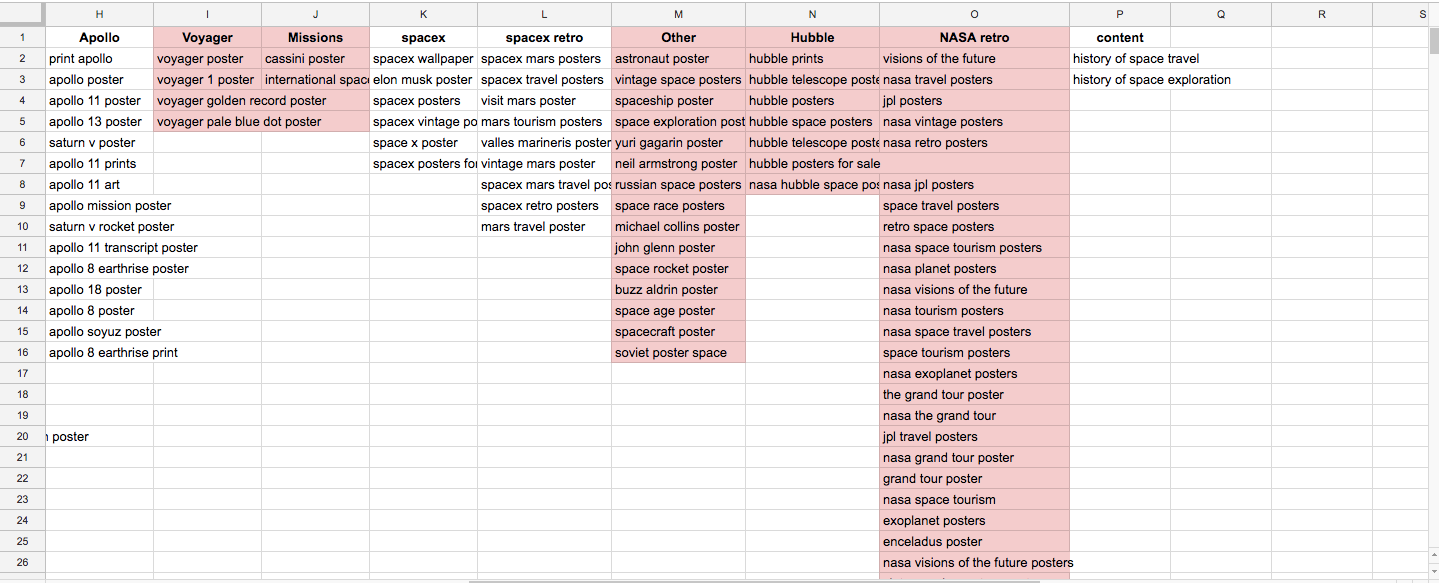
I’ve added all of the columns marked in red to my negative keywords. Some of them I will remove in the future as I build out my product catalog.
2. From the Search Terms report in your Google Ads account
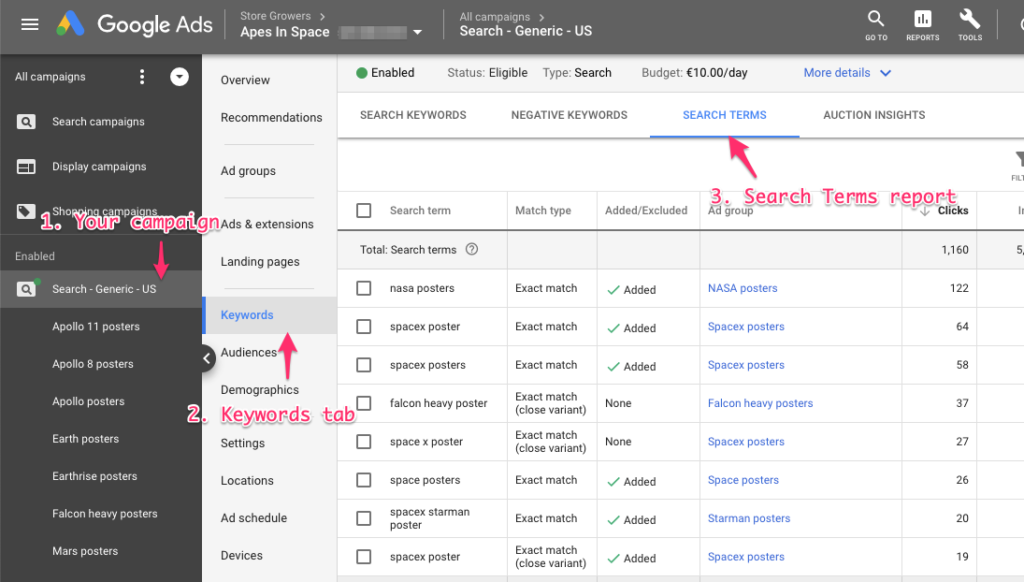
Then you add the keywords to a specific ad group, a campaign or to a negative keyword list which allows you to share negative keywords between multiple campaigns.
You need both approaches, but the more search queries you can filter after that first step, the cheaper it will be. Otherwise, you need to pay for the click first to discover that it’s a bad keyword.
Step 8: Last settings check
The campaigns are now almost ready to go live. But before they go live, I go through the last settings check.
Here is my checklist:
Settings:
- Select the correct network (= Search network only!)
- Target the correct country
- Target the correct language(s)
- Double-check the bidding strategy (I start out with manual CPC)
Advanced settings:
- Ad rotation: Optimize: Prefer best performing ads (default option)
- Locations options: People in your targeted locations & Exclude People in your excluded locations
Keywords & ads:
I will often run a last time through the keywords and ads to make sure the match types are correct and that there are no spelling mistakes in the keywords or ads.
Step 9: Link Google Ads & Google Analytics
This is a step that I still see missing from a lot of accounts. Linking Google Analytics will give you the information about what happens after the click: a purchase and for how much.
It’s essential information to know how your Google Ads campaigns are performing.
To link the accounts, open up the Admin section of your Google Analytics account:

Then select the correct Google Ads account from the list.
Now the data is flowing from Google Ads to Analytics.
Next, we need to make sure that we can also see in Google Ads what happens in Analytics.
To achieve that we’re going o import the ecommerce transactions as Conversion in Google Ads:
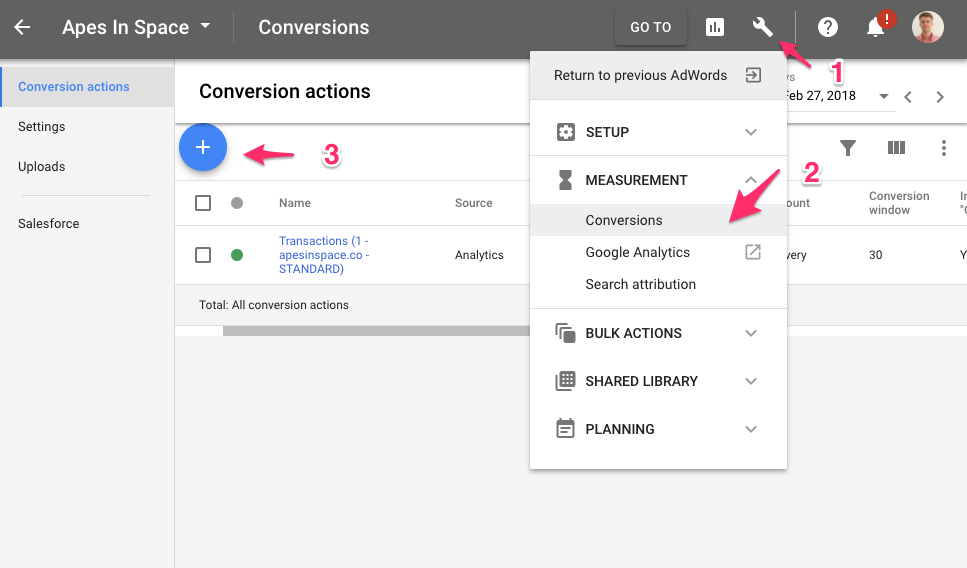
Pick import from Google Analytics and select the correct goal. (If you have multiple views in Google Analytics you’ll see multiple goals here, pick your most important one)
If you haven’t set ecommerce tracking in Google Analytics, get that sorted before you launch your campaigns!
Step 10: Campaign Launch
We’re finally ready to go live.
All you can do now is to sit back and wait for those sales to roll in.
Probably that won’t happen instantly. So in the hours, days after launching, keep a close eye on the search terms reports and max CPCs. You might have to tweak these two parts to get more visibility and show up for the searches that are relevant to your business.